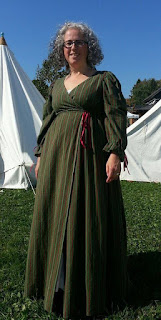
Last year for my husband's and my 25th Anniversary, we started participating in 1812 living history (reenacting). Before we started, I spent a few months gathering goods, including a couple of dresses. One that was made by a local seamstress and the other made with the help of my daughter and her sewing machine.
After a great season wearing both dresses and talking to a number of lovely people about common folks and their attire, I decided I wanted to make something that would be not only more practical for summer events, but also as historically correct as possible for my station (a trooper's wife), my duties as a camp follower, and the fact that I have to dress myself in the morning.
After much discussion and research, I decided on a front stomacher dress. It's period correct, it's easy to get on by yourself, and it's practical for every day use. A wonderful group of expert historical wear makers led me to a great Laughing Moon pattern.
I will be very honest. I was terrified at the prospect of doing this project. I have never in my life made a whole outfit. My plan was also to do it entirely historically correct, so that meant sewing the whole dress by hand. That wasn't the most terrifying part, as I've hand sewn a number of smaller projects and I'm pretty comfortable with that skill. No, it was the idea of cutting out the pattern. I have never done anything with a pattern before.
It made me sweaty with anxiety just thinking about it. I ended up waiting for my daughter Miranda to be home to help. And I'm glad I did. While the Laughing Moon patterns are brilliant and have lots of detail and information, I had no clue what a lot of it meant. My anxiety went away having her around to say "Mom you just do this". That's all I needed.
Material, and all cut up ready to make a dress.
Again I have to thank Laughing Moon. The book of instructions that came with the pattern has lots of images, and that helped me tremendously. I learn much better seeing how something is done than by reading about it. The whole process was very slow going, as I read and looked, and did it again before I started stitching anything.
Eventually, I got the first part done and started to feel a little more confident.
Bodice with lining
Then, I did the next big step - attaching the sleeves. It's probably good that I haven't used a pattern before, because the seams for this period dress sit in very different positions than on a modern pattern. But I did it, and I was so excited I took a photo of me with the top part of my project all done.
This is one half of the back and side.
Afterward, it was a case of attaching the two back pieces, and the sides to the front. The pattern simply wanted the seams cut down and pressed flat, but as I wasn't going to be lining the skirt, I ended up stitching down all the seams so it looked neater.
Should make it more durable too.
After that it was time to attach the back to the bodice. I practically did a little dance when I got them together.
I was getting pretty excited at this point.
The last big part to putting this together was to attach the front pieces, create and attach the straps, work out where to attach the buttons and make button loops (I'd never done this before either).
My very first ever button loop.
I finished my dress yesterday - Mother's Day - in remembrance of my mom. She was a brilliant seamstress and I think she'd be mighty proud.
I'm really looking forward to events this summer. Here's hoping my hand stitched dress will hold up to everything I put it through.
Cheers, Lee


No comments:
Post a Comment